2.Choose the Rectangle 
---------------------------------------------
3. Toward the top of your screen pick the amount you want your photo to be feathered (I prefer between 40-80)
4. You are now ready to make your rectangle. You must pick the feather amount before creating your rectangle or you will have to redo your rectangle.

---------------------------------------------
5. Holding down your left mouse button drag your + to the opposite corner to create the rectangle. If after letting go of the mouse you don't like the size of your rectangle move the + outside of the rectangle and left mouse click. This will erase your shape and you can repeat step 4 until you get a result you like. If you like the shape but need to reposition the rectangle left mouse click inside the rectangle and you can now move it anywhere you want.
6. Hit Control c (to copy) and then Control n (to create a new page). Once the screen below pops up simply hit Enter or click on OK. It will automatically read the size of your photo and create the size that you need.

---------------------------------------------
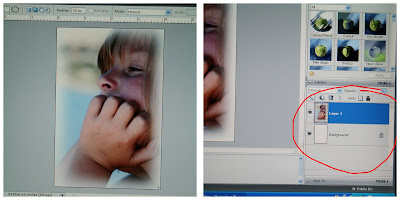
7. Hit Control v (to paste) and your photo should appear feathered around the edge.
8. At the bottom right of your screen you will see that your feathered photo is in two layers.
 ---------------------------------------------
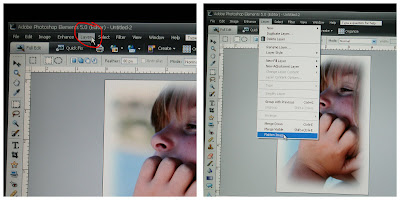
 9. Go up and click on Layers.
10. Scroll down and click on Flatten at the very bottom of the list.

---------------------------------------------
11. You now have a flattened photo that you can save.
---------------------------------------------
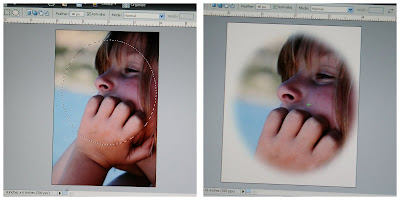
12. You can also create ovals and circles by clicking on the Oval Marque Tool.
13. Choose your feather amount and repeat the steps above.
---------------------------------------------
14. This is what an item looks like using 0 Feather.
15. This is an oval feathered at 40 
---------------------------------------------
16 & 17. You can also create circles using this tool.
 ---------------------------------------------
---------------------------------------------
20. Choose your feather amount, left click on the mouse and while holding down on the mouse move the lasso tool around where you want to feather the photo.
21. If you accidentally lift up on the mouse, the lasso tool will automatically connect itself to where you started. Simply click outside of the shape and begin again.
 ---------------------------------------------
22. Let go of the mouse when you reach your beginning point to create a connected line.
23. Repeat steps 6 through 11.
Please let me know if this is 1) helpful to anyone 2) understandable 3) confusing. I would really appreciate the feedback. Good Luck!


9 comments:
Thanks Amy. You are adobe friendly and that is something I am not. So it is nice to know just a few things.
I love this...I guess I'm going to have to break down and get Adobe huh? :) I know I bet you can't believe I don't have it!
This was a PERFECT tutioral Amy that you so much!
Sorry to hear about your freezer mishap. Ugh.
Try and have a great weekend,
Robin
I think I have adobe on my computer. At least the word is there on the programs list. We used to have a photoshop program and I got to be pretty good with that, but now I haven't done anything like that in so many years that it now sounds so confusing to me. You are definitly inspiring me to start back up and learn to use adobe.
That is so cool. I'll have to try that sometime. I LOVE how it turns out. You did a great job.
Bye bye.♥☺♥
I'll admit, until I get my Adobe up and running I won't read every step of this, but I know I'll be back to read it soon! Just looking at the pictures as they progressed was cool. That's a great pic of Sydney.
Awesome! Your directions were so easy to follow. I had so much fun learning this technique! Thanks for posting this. I can see you put a lot of time into your directions with the pictures and circling the areas to further draw attention to your instructions. All so very helpful.
I noticed the background of the picture is blurred. Did you create that by just running the blur tool over all that area or is there a better way to blur the background so the eye is drawn to the subject in the picture?
Wow! Very thourough and complete with pictures! I'll have to give this a try but I'm not sure my 6.0 version does this the same exact way. I had to play around a little bit differently on the color/black and white tutorial you posted but it was close enough that I got it to work. What version do you have?
I love all your teaching classes so far. I am going to try this now...
You are so awesome.
Thanks!
I just thought I would tell you again, how very helpful your instructions are. I have referred back to it at times when I need a recap!
I love it when you teach me Adobe shop tricks :-)
Post a Comment